Modular Cable Trunking System
Cable management is one of those boring problems that only becomes visible when it is bad. Behind a desk, under a sim rig, or along a garage wall, loose cables make everything harder to inspect, clean, and change later.
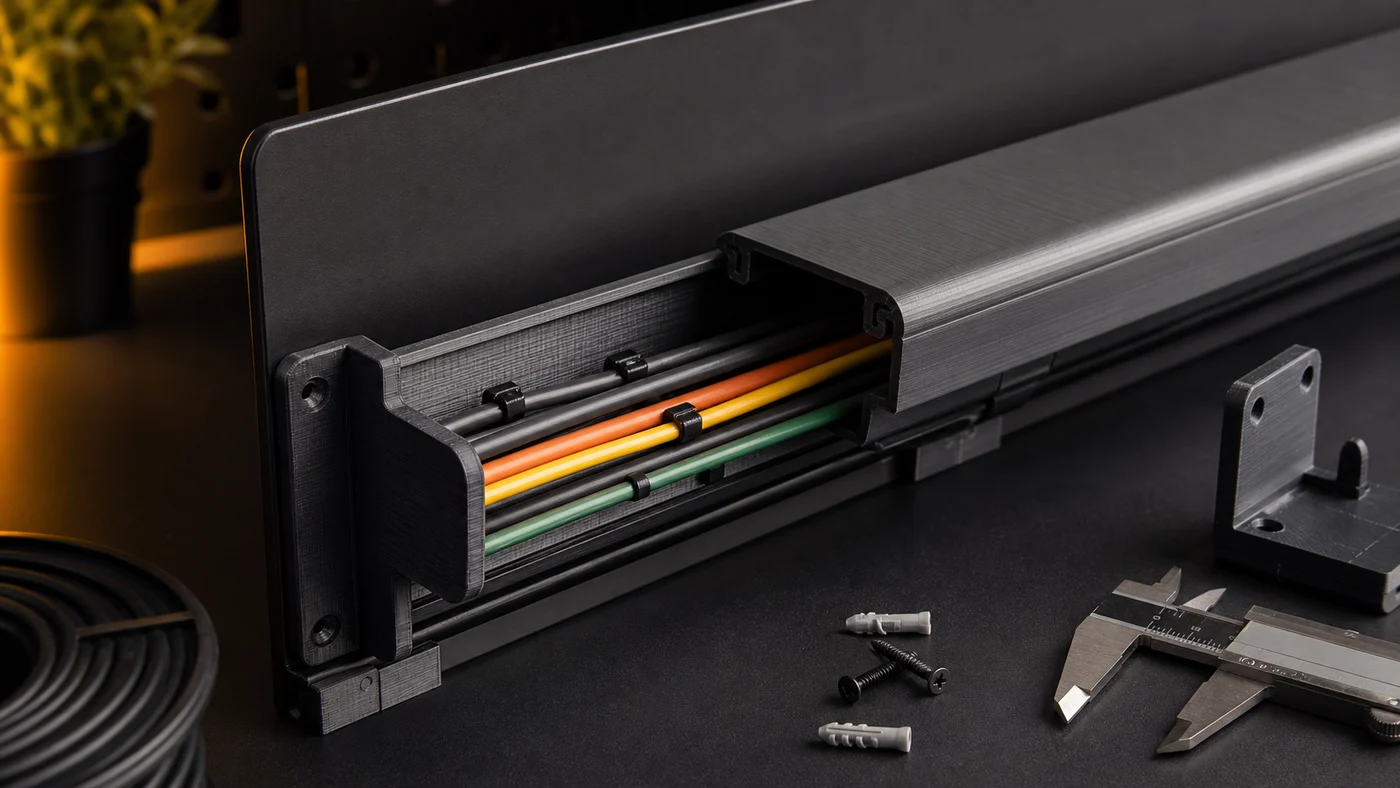
The idea for this project was simple: make a modular trunking system that can be printed in small sections, mounted with normal screws, and opened again without destroying clips or fighting adhesive tape.
Design target
I wanted three things from the first version.
First, each section had to fit comfortably on the Bambu Lab X1C bed without needing support. That pushed the profile toward a split design: a base rail that mounts to the wall and a separate lid that snaps on from the front.
Second, the lid needed to be removable by hand. A cable run is never finished forever. New monitor, new USB hub, new charger, new sensor cable - the moment the cover becomes difficult to remove, the whole system stops being useful.
Third, the profile needed enough room for mixed cable sizes without becoming huge. The current draft is tuned for small power, USB, network, and low-voltage accessory wiring rather than thick mains bundles.
The snap fit
The most important part is the clip geometry. Too tight and the lid deforms after a few removals. Too loose and the whole thing rattles every time the desk moves.
For PETG I like leaving a little more flex in the lid than in the base. The base can be stiffer because it carries the mounting load. The lid should do the moving. On this version the hook is shallow, with a small lead-in angle so the cover does not need to be perfectly aligned before it starts engaging.
The first print looked right but felt wrong. It snapped on nicely, then took too much force to remove. The fix was not only reducing the hook depth. I also added a tiny relief behind the latch, which gives the plastic somewhere to flex instead of whitening at the corner.
Mounting and joins
Each base section has countersunk screw points and a small end registration feature. The registration is not structural; it just keeps adjacent rails visually aligned while the screws do the actual work.
For long runs I would rather have more short sections than one massive print. Short sections are easier to replace, easier to print cleanly, and less likely to warp. It also means I can print only the parts I need instead of committing half a spool to one long channel.
Print settings
For a practical part like this, PETG is the easy choice. PLA is fine for a prototype, but the clips are exactly the kind of feature that benefit from a little more temperature tolerance and flex.
Current baseline:
- 0.2 mm layer height
- 3 walls
- 15-20% gyroid infill
- PETG, dry spool
- lid printed face-up for the cleanest visible surface
The lid surface matters more than the base surface because it is the only part you keep looking at. I am fine with the base showing layer lines. I am less fine with a lid that looks like a rushed prototype.
What I would change next
The next version needs a proper corner piece and a printable drilling template. Straight sections are easy; the messy part is where a cable run turns under the desk or drops behind a cabinet.
I also want a wider version with a divider for power and signal cables. It would not make this a certified electrical raceway, but it would make the layout cleaner and easier to reason about when everything is mounted in the same area.
For now, this is already good enough to replace the usual bundle of zip ties. That is the point of this kind of print: not clever for the sake of it, just a custom part that makes a repeated annoyance disappear.